
If you are not happy with the lack of sound from your stock pipes there are some things you can do... but you need to be DAMN sure before you start doing anything like this, as it can void warranties, ruin the pipes, cause irreparable damage and stuff...
On the other hand, we are all grown-ups here, right? We know what we're doing, right? We can take responsibility for our own actions, right? No-one else can, can they? Well, if we know what we are doing and we feel responsible enough to take the consequences of our actions, we can do what we feel we are able, to remedy whatever we feel could be better, right?
(The above is a kind of disclaimer, if you like. Basically, you are responsible for your actions and no-one else. If you copy what others do, or what you see here, and screw it up it's nobody's fault but your own. Do not attempt this at home if you do not feel comfortable that you will be able to do this. It is presented as information to warn and help you to avoid possible damage to your possession. There is a right and a wrong way to do all things.)
Ok... Now that that's out of the way, lets get to it...
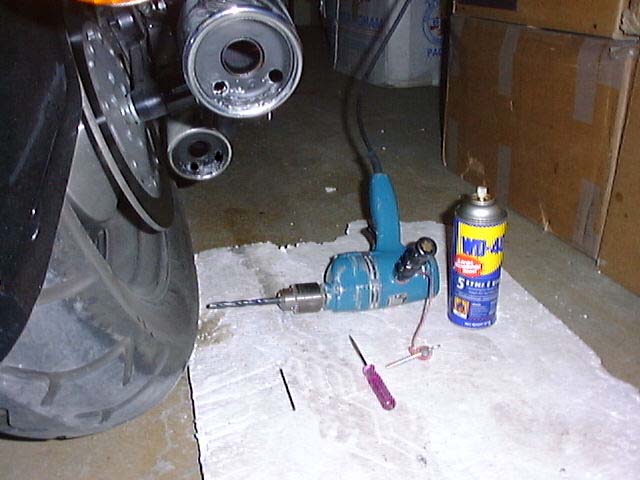
Ok, if you look at the back of the exhaust pipe, you can see or feel with your fingers the points where they welded the plate to the inside shield/muffler. Avoid drilling into these welds. You don't want the inside to be dangling about... Rattling is not the sound you are after, right? You want some macho pipe sound, right? Well... Choose an area beside the welded points. I used a pointy screwdriver to make the initial dent that the small drill would settle into. You don't want it going all over the place when you are trying to make a straight hole, now, do you! (Rhetorical question, there).
Ok, you start drilling, and get through the outside plate! Remember to use some lubricant, metal drilling metal means HEAT! ... Hey! Surprise, surprise! There is another layer inside this... I didn't know if I should, but I drilled through that as well. It took a while, this is made of some heavy metal! My whole arm was wasted after just the first hole! Still, what thou startest, that should thou finish... lest it remain unfinished evermore... Thus called the Raven: (n)Evemore... (poetic license) ... but... as I nodded nearly napping, suddenly there came a tapping, as if someone gently rapping upon my garage door... 'Tis some visitor I muttered, only this and nothing more... and so, with arm, weak and weary, I resumed the drilling dreary, and continued what I had been doing just before...
Now... After I drilled with the 4mm drill, the hole was ready for the 10mm drill! Man, it would have been better the have some sort of fixture or holder to steady the drill... At first it was a bit difficult to hold it in place, as it really didn't want to stay in the hole... but I'm a persuasive guy... I should do well on my honeymoon...
Well, now I have 2 holes in the bottom pipe and two in the top. The sound went from a muffled - dub dub dub - to something like - pat pat pat - ... Perhaps with a few more holes I'll have something in the direction of Saemundur (see the owner's pages). That's a - put put put -... but BEWARE... After you finish drilling, spray the whole thing with ANTI-RUST spray, or, if you are finished drilling, put on a coat of - high heat tolerant - anti-rust paint, just to protect the bare metal that is left.
I must confess, I'm one of these fair weather riders, unless I can't help it... and I would not suggest drilling to anyone who is likely to do a lot of rain riding, as I don't think it's a very good thing for water to get into the muffler. The combination heat/water will lead to rust really fast. Suzuki have obviously had this in mind the way they closed off the muffler from the chrome exterior. There is the good and bad side to this... Bad: The stock pipes might get damaged in the long run... Good? Firstly: The sound. Secondly: I can always get myself custom, aftermarket pipes, later, and I get an even better sound...
The way I look at it, I can only win... That's why I went ahead with it.
Ps. I must confess, while drilling, I did expect the spirit of this great motorcycle to manifest itself and disapprove... I can confirm, now, that I think, all in all, it's as pleased as I am with the improved sound.... Let us ride together through the years, oh my love, my life... In the silence of the night, let a candle always burn, may we never lose the lessons we have learnt. (Loosely borrowed from Queen).
The Continuing Saga...
2 holes not good enough for ya? Want more? What will your beloved say! ... Well, in my case, my beloved motorcycle has no say in the matter... I am used to a bigger badder sound, and that's what I aim to get... However many holes I have to make!!!
Ok, I was trying to visualise it... So I got out pen and paper... eh... No, that was in the old days... Nowadays, we get out "Photoshop"... and Fiddle with the look, to see which was best... Ok, first I went the whole hog, putting in as many holes as I could, and still make it look fairly decent... I went for 8 holes... here's how that would look:
Computer edited image: 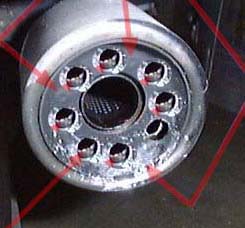 (Not finished product)
Hmmmm... A bit crowded, if you ask me... It would be better if the welded bits weren't in the way... You have to look at it from the point of view of the car behind you. They are going to see you have been tampering... and the better you make it look, the less likely thay are to think it was a home made tampering... So how do 6 holes look, then?
Computer edited image: 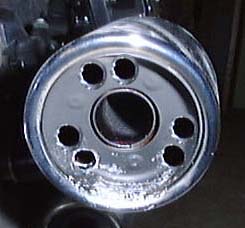 (Not finished product)
DAMN! That looks fine! ... So 6, nicely patterned holes it is... :-D ... or so I thought... Well, things don't always turn out the way you want then to, when you are lying on the floor in a garage with freezing cold wind and rain blowing up your back! So I started with a nail, making the guiding holes... and no matter how I tried to envisage it, it never looked like the photoshop thing above us, here... The holes were always too close together... or too far apart... So I ended up with the 5 holes below!
Before painting:  ... and
cleaning up.
... and
cleaning up.
Well? How do you like it? You see... When you are discussing or planning it, it is totally different from when you are doing it... Well, I'm done for now... I bet, though, I'll be looking for custom pipes before long... Or doing some more drilling! I donno... What am I supposed to do now that I've finished this? ... You ever get that feeling, there is nothing more to do?
Oh yeah... I've got to paint it too... I forgot about that... More pictures soon.
Send eMail to TheStone@Unforgettable.Com - TheStone Home Page