Ron Kerlin's 1500 LC Light Tips
WIRING FOR LIGHTBAR
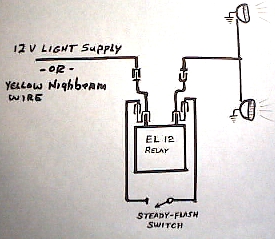
LIGHT FLASHER - OR -
HEADLIGHT FLASHER
Equipment:
(1) Tridon/Stant Flasher relay, EL12, $7.99 at Advance Auto Parts (This is a heavy-duty relay. Others may or may not work satisfactorily.)
(1) Spst switch, capable of handling 6 amps current at 12 vdc. Available at Radio Shack.
(2) Solderless, crimp-on wire connectors, insulated, female with male piggy-back. Available at NAPA auto parts.
(4) Female solderless crimp-on insulated female connectors. Available at NAPA auto parts.
(2) Male solderless crimp-on insulated male connectors. Available at NAPA auto parts.
Approx. 2' of #16 stranded wire. Available at NAPA auto parts. (Note: Do not use wire smaller than #16)
Approx 2" of velcro adhesive-backed, both hook and loop sides.
FOR LIGHTBAR MOUNTED LIGHTS:
Remove headlight lens and bulb assembly by removing the 2 phillips screws on each side of the forward headlight housing.
Trace lead from lightbar switch, or lamp. You should be able to find this lead routed inside the headlight shell, or beneath the headlight shell, depending on the lightbar installation.
Cut this lead, and to one end, crimp on a female insulated connecter, to the other end, a male insulated connector.
If you are going to mount the relay inside the headlight shell, make up 2 short jumpers, (approx. 2"), with insulated connectors to match up with the ones you installed during the previous step. On the other end of each of the short jumpers, crimp on a FEMALE insulated connector with the piggyback male spade.
If you are using the 3 prong relay, break off
the lead that is NOT a facing lead. You should be left with 2
facing leads, like the prongs of an electrical plug They should
be labelled "x" and "l" The lead labelled
"p" is the one that should be broken off.
This relay is also available in a 2-lead configuration, with the
leads labelled "x" and "l". I assume this is
wired the same, but have not tried one.
Attach the 2 short jumpers to each connector
you put on the lightbar lead wire. Plug the relay into the 2
piggyback female insulated connectors. At this point, the
lightbar lights should flash when power is applied. To add a
switch to switch between flashing and steady, make up 2 more
jumpers, about 14" long, each with a FEMALE insulated
connector on one end.
Attach these jumpers to the MALE spade of the piggyback connector,
and route them thru the hole in the back of the headlight housing,
behind the fork shield, ending up at the top of the forks, behind
the shield.
Attach the switch to this end, add the velcro
tape pieces to hold it in place behind the forks, and you are
finished. Note that the only thing this switch does is to short
the 2 relay leads together, effectively bypassing the relay, and
rendering the lights steady instead of flashing.
The reason for the 2 short jumpers is to allow the entire
assembly to be removed, and then you can just attach the male and
female connectors on the lightbar supply wire together.
If desired, you can mount both the relay and the switch outside of the headlight shell by just making the 2" jumpers long enough to reach the back of the fork covers. There is plenty of room there, even with the forks hard over.
FOR HEADLIGHT FLASHING:
Inside the headlight shell, you will find the connector that plugs to the back of the headlight bulb. It contains 3 wires, Yellow (High beam), White (low beam), and Black with a white stripe (ground). Simply cut the wire to the beam you wish to flash, (highbeam recommended), and follow the instructions as per the lightbar installation. Make sure that the switch you use for the steady/flash switching can handle the 6 amps that the headlight draws.
DISCLAIMER: THE INFORMATION PROVIDED SHOULD BE UTILIZED AT YOUR OWN RISK. LEGALITY OF FLASHING LIGHTS MAY DIFFER FROM STATE TO STATE. AS THIS IS A MODIFICATION, ALBEIT MINOR, THIS MAY IMPACT THE FACTORY WARRANTY.
Ron Kerlin - eMail